Protect
table and clothes
Cover your workspace with an old tablecloth or sheets of newspaper, and wear something to protect your clothes, like a smock.
Cut
the jug
With strong scissors, cut the plastic jug in half lengthwise. Turn the jug upside-down: The handle will serve as the masks nose. Cut holes for your eyes and mouth with a craft knife. Cut a small hole on each side of the mask, at ear level, for an elastic band.
Make
paper strips
Tear newspaper and white computer paper into strips about one inch by six inches. Shredding the paper by hand works better than cutting it. Youll need enough pieces to cover your mask with three layers of newspaper and one layer of computer paper, plus some extra paper for molding facial features.
Mix
up some paste
Whisk two cups of flour and one cup of water into a paste, adding a bit more of either, if needed, to reach a gluey consistency.
You can also use glue thinned out with water.
Dip
and press
One by one, dip a newspaper strip into the paste, shake off the excess, and lay it flat against the mask horizontally, taking care not to cover the holes. Overlap each strip with a new one. When youve finished the first layer, let it dry completely before putting on the next one. This time, apply the strips vertically.
If you’re putting away your project
for the night, store the unused paste in the refrigerator. The
next day, microwave it for one minute before using.
Create
a face
Apply the strips for the third layer horizontally. After youve applied three layers, mold some of the newspaper strips into features, like cheekbones and eyebrows.
Apply
the final layer
Make the last layer out of the torn computer paper, applying the strips vertically. The white paper will give you a blank canvas for creating your character.
If you live in a damp climate, you can dry
the mask on a lightly oiled cookie sheet in an oven set to warm.
Check on the mask after about 30 minutes.
Decorate
When the mask is completely dry, decorate it with paint, feathers, glitter, sequins, beads, fabric, rhinestones, or whatever will make it your own!
 Protect
table and clothes
Protect
table and clothes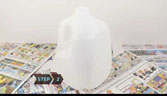 Cut
the jug
Cut
the jug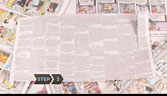 Make
paper strips
Make
paper strips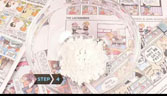 Mix
up some paste
Mix
up some paste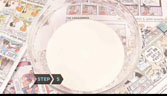 Dip
and press
Dip
and press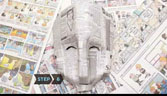 Create
a face
Create
a face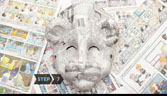 Apply
the final layer
Apply
the final layer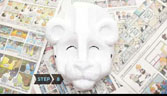 Decorate