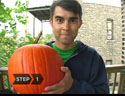
Choose
pumpkin
Choose a pumpkin thats large and smooth with a stem of at least 2".
If you plan to put a candle inside, choose a gourd thats at least 9"
tall.
Pumpkins with smaller stems rot quickly.
Draw
circle or hexagon
Draw a circle or hexagon on the top of the pumpkin an inch or two below
the stem. Dont worry if its not perfect, but make sure its a little
bigger than your fist.
Carve
through pattern
Carve through the pattern with a pumpkin knife (if a sharp knife is
use caution must be used). Angle your cut so the top of your circle
is wider than the bottom, which will ensure that the top fits snugly
in place.
Remove
top & clean out
Remove the top and clean out the pumpkins seeds and stringy membranes
with the scooper. Continue scraping the inside until the walls are about
half an inch thickotherwise it will be hard to carve.
For a delicious—and healthy—treat,
wash and sprinkle the seeds with salt, and then toast them in
the oven on a baking sheet.
Draw
face
Draw the eyes, nose, and mouthor any other pattern you want, like perhaps
Van Goghs famous painting The Starry Night.
If you’re not good at drawing, find
a carving template online or at a store. Fasten it to the pumpkin
and use a thumbtack to poke holes along the lines.
Cut
through pattern
Use your knife to cut through the pattern youve just drawn. Remember
that cuts that connect to each other will remove the entire piece in
between, so cut around anything you want to stay intact, like teeth
or a wart on the nose.
Make
cuts & scrapes
Make disconnected cuts and scrapes to allow the light from inside the
pumpkin to shine through without removing whole pieces, a good technique
for drawing outlines or scenes, or for creating more definition in a
facelike glowing pupils.
To keep the edges from browning before the
big night, dab on a little petroleum jelly to lock in moisture.
Place
candle
Place a small candle and light it when youre ready to show off your
work. If theres a large opening level with the candle, like a mouth,
light the flame through it so you dont burn your hand.
If your flame is weak or keeps going out,
it’s not getting enough oxygen—cut a small opening
in the top of the pumpkin, hidden from sight behind the stem.
Use
glow stick or battery-powered light
If youre not keen on having a real flame, use a glow stick or battery-powered
light.
 Choose
pumpkin
Choose
pumpkin 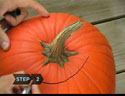 Draw
circle or hexagon
Draw
circle or hexagon 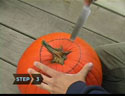 Carve
through pattern
Carve
through pattern 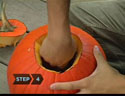 Remove
top & clean out
Remove
top & clean out 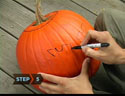 Draw
face
Draw
face 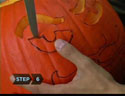 Cut
through pattern
Cut
through pattern 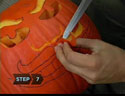 Make
cuts & scrapes
Make
cuts & scrapes 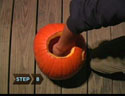 Place
candle
Place
candle 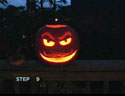 Use
glow stick or battery-powered light
Use
glow stick or battery-powered light