Something to string your beads on, like beading elastic or embroidery
floss
Steps
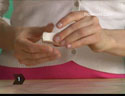
Shape
clay
Shape one shade of clay into a rectangle about 2 inches by 1 1/2 inches
and 1 inches thick. Do the same with the other two colors, and set aside
your three leftover lumps of clay.
Stack
rectangles
Stack the three rectangles on top of each other.
Cut
in half & stack
Cut the stack in half with your plastic knife and re-stack the two halves,
one on top of the other.
Press
stack down
Press the stack down to its original size and shape.
Cut
in half again
Cut the stack in half again. Now youll have two stacks with lots of
colored layers. Set them both aside.
Form
cylinder
Pick one color of leftover clay and roll it into a ball. Then place
it on your work surface and use the palm of your hand to roll it back
and forth until it forms a cylinder thats about the same length and
height as your stacks.
Cut
slice
Cut a long, even slice from one of your clay stacksnot like youre
slicing bread, but lengthwise from end to end.
Surround
cylinder
Place this long slice on the cylinder so that it stretches from one
end to the other. Cut another slice from the stack and put it right
next to this one, and another next to it, until the whole cylinder is
surrounded. Set your leftover stacks aside.
Make sure the colors alternate as you place
the slices next to each other, so you don’t have two stripes
of the same color next to each other.
Smooth
cylinder
Now that the whole cylinder is covered, gently squeeze it to press the
slices so that the covered cylinder becomes one smooth cane.
Lengthen cane
Place the cane on your work surface and roll it back and forth. To make
it longer, hold each end and gently pull. Roll and pull until the cane
is the diameter that you want your beads to be.
Repeat
process
Take another color of leftover clay, roll it into a cylinder, cover
it in slices of the leftover stacks, and roll and pull it into a cane
like your first one.
Repeat
again
Take your third color of leftover clay, roll it into a cylinder, cover
it in slices of the leftover stacks, and roll and pull it into a cane
like your first and second one. You now have three canes with different-colored
centers.
Slice
flat beads
Use your plastic knife to slice flat beads from each cylinder. Make
sure theyre all the same thickness.
To get the cleanest cut possible, let the
canes sit for a few minutes before you slice them or put them
into the freezer for a few minutes to firm them up.
Line
with paper
Line the baking sheet with the paper.
Make
holes & string
Now make holes through the sides of your flat beads so that you can
string them (and their colored centers will face out). Twist the needle
halfway through one side of a bead, then twist it through on the opposite
side until the holes meet. Place each bead on the lined baking sheet,
making sure they dont touch.
Make round spacer beads by rolling small balls
of clay and piercing them with the needle. Place them on the baking
sheet.
Bake
beads
Have a grown-up help you heat the oven to 275 degrees, and bake your
beads for 15 minutes per quarter inch of thickness. For example, if
your beads are half an inch thick, bake them for 30 minutes.
Take
out of oven
Take your beads out of the oven when theyre finished and turn the oven
off. Let your beads cool.
String
beads
Cut a piece of elastic, embroidery floss, or lanyard string to whatever
length you want for a necklace or bracelet. String your beads in whatever
pattern you like, knot the ends together, and show off your one-of-a-kind
millefiori creation.
 Shape
clay
Shape
clay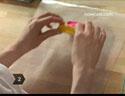 Stack
rectangles
Stack
rectangles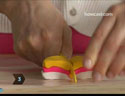 Cut
in half & stack
Cut
in half & stack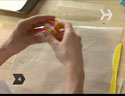 Press
stack down
Press
stack down Cut
in half again
Cut
in half again Form
cylinder
Form
cylinder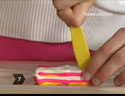 Cut
slice
Cut
slice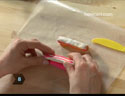 Surround
cylinder
Surround
cylinder 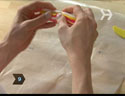 Smooth
cylinder
Smooth
cylinder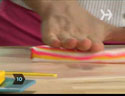 Lengthen cane
 Repeat
process
Repeat
process Repeat
again
Repeat
again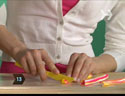 Slice
flat beads
Slice
flat beads Line
with paper
Line
with paper Make
holes & string
Make
holes & string Bake
beads
Bake
beads Take
out of oven
Take
out of oven String
beads
String
beads